Problem: Icemaker on strike

1 of 1
Problem: Tiny ice cubes
Easy fixes for an icemaker
1 of 5
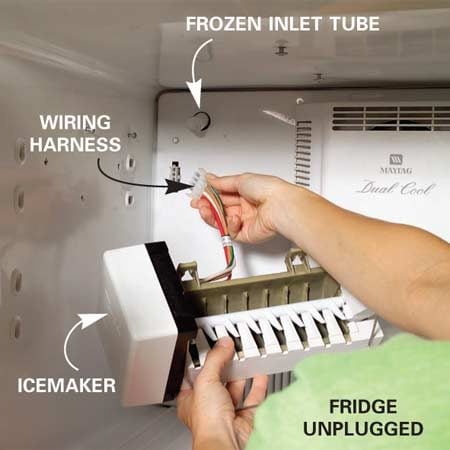
Photo 1: Remove the icemaker
Remove the screws that hold the icemaker in place. Unplug the wiring harness and remove the icemaker to expose the water inlet tube.
« Previous Photo
Next Photo »SECOND, unblock the saddle valve (Photos 3 and 4). Most icemakers are connected to the household water supply by a “saddle” valve. One problem with saddle valves is that the needle hole in the pipe can clog. Fortunately, that blockage is easy to clear once you locate the saddle valve (Photo 3). If you have an unfinished basement, you'll probably find a tube beneath the fridge that leads to the valve. Otherwise, look under your kitchen sink.
THIRD, replace the water inlet valve (Photo 5). At the back of your fridge, there's a small electric “inlet valve” that turns the water supply to the icemaker on and off. Before you replace the valve, make sure water is flowing to it: Turn off the water at the saddle valve (Photo 3) and disconnect the supply tube from the inlet valve (see Photo 5). Hold the tube over a bucket and have a helper turn on the saddle valve. If water flows out of the tube, the water supply is fine and chances are the inlet valve is bad. See “Finding Fridge Parts” for help finding a new valve. When the job is done, turn the water back on and check for leaks before you push the fridge back into place.
Caution!
Always unplug the refrigerator before you make any repairs.Problem: The fridge produces puddles

1 of 1
A leaky refrigerator
Easy solutions for fridge leaks
1 of 5
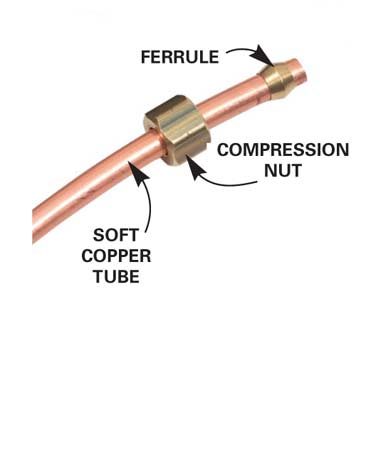
Photo 6: Close-up of leak-prone parts of a compression fitting
« Previous Photo
Next Photo »SECOND, level the fridge (Photos 7 and 8). Water drains into a pan under the fridge where it evaporates. If your fridge is badly tilted, water can spill out of the pan. Leveling the fridge solves this problem (Photo 7).
THIRD, clear the drain tube (Photos 9 and 10). If the drain tube in the freezer gets plugged, water leaks into the compartment below or onto the floor. To unplug it, first remove the cover panel (Photo 9). In some models, you have to unscrew the floor panel too. Use a hair dryer to melt any ice buildup. Sop away the melt water with a sponge. Then clean up around the drain hole. Blow air through the tube to clear it. Any tube that fits tightly into the hole will work. You can also use a tire pump or air compressor (turn the pressure down to 30 psi).
Problem: Fridge or freezer won't cool

1 of 1
Freezer failure!
Easy solutions for cooling problems
1 of 3
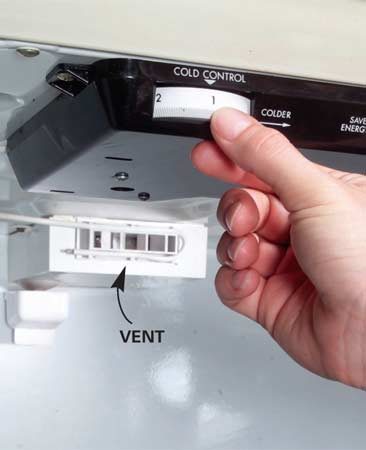
Photo 11: Check the temperature control dial
Adjust the temperature control dial. Also make sure the vents inside the fridge or freezer compartment aren’t blocked by containers.
« Previous Photo
Next Photo »SECOND, clean the coils (Photo 12). In order for your fridge to create a chill, air has to flow freely through the condenser coils. On most older refrigerators, these coils are on the backside. Cereal boxes on top of the fridge or grocery bags stuffed behind it can reduce the needed airflow. Most newer refrigerators have coils underneath, where they can get blocked by trash and plugged with dust. Even if your fridge is working fine, you should pull off the front grille and clean the coils every year for efficient operation; do it every six months if you have shedding pets. Long brushes are available at appliance stores for $8.
THIRD, free up the condenser fan (Photo 13). Coils on the back of a fridge create their own airflow as they heat up. Models with coils underneath have a fan to push air through them. Dust buildup can slow the fan; wads of paper or other trash can stop it altogether.
Problem: A noisy fridge

1 of 1
Constant refrigerator noises can drive you nuts
Easy solutions to refrigerator noises

1 of 2
Photo 14: Remove the fan
Unscrew the fan from the rear wall of the freezer and unplug the wires. With some models, you'll need a socket set or nut driver to remove the fan.
« Previous Photo
Next Photo »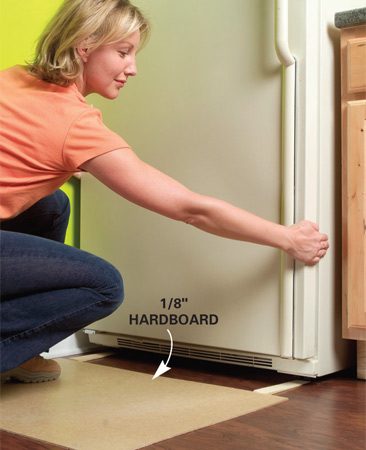
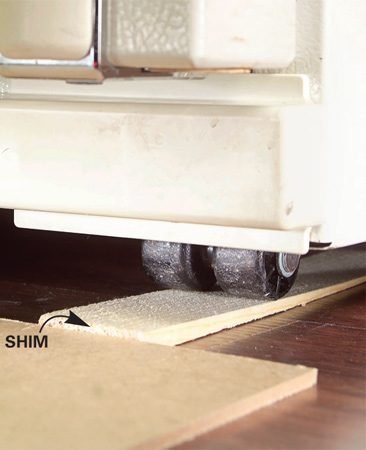
Don't Wreck The Floor When You Pull Out The Fridge
Nine times out of ten, you can pull out a fridge without any damage to the floor. But a sideways skid or a grain of sand caught under a wheel can scar any floor—I even managed to scratch the ceramic tile in my kitchen. At the very least, lay down a cardboard runway before dragging out your fridge. For the ultimate floor protection, use 1/8-in. hardboard (at home centers). A pair of shims create a ramp for easier pulling.Finding Fridge Parts
- To get the right part for your refrigerator, you'll need the model number, which is usually stamped on a tag inside the fridge. If you can't find it anywhere on or inside the fridge, check your owner's manual.
- To locate a parts dealer in your area, look under “Appliances, Major, Parts” in the Yellow Pages or online.
- To mail-order parts for any major brand, go to www.sears.com or call (800) 4-MY-HOME.
Required Tools for this Project
Have the necessary tools for this DIY project lined up before you start—you’ll save time and frustration.- 4-in-1 screwdriver
- Adjustable wrench
- Level
- Nut driver
No comments:
Post a Comment